|
|
| Fix Hinges on Compaq Presario 700 Laptop |
|
|
Back in 2007 I bought a second-hand Compaq Presario 700 laptop on the cheap so I could have a laptop to take to class, on vacation, etc. When I bought it, the hinges were already loose, but it wasn't much of a problem. However, after about a year of use the hinges finally gave out completely: a common problem with old laptops, particularly this model from what I've since read. It is still a decent machine for checking e-mail, surfing the web, and playing older games (but not much else); so, I decided to fix the hinges on it.
There are a few good resources online that explain this process, in particular
Daniel Armbust's Homepage. I used this site as the main guide for attempting this repair, but the lack of pictures illustrating the process was troublesome. To that end, I decided to document my repair with photos at key points (click the images to view them larger).
Before attempting this, make sure you have a Torx-8 screwdriver, a flathead screwdriver (or similar prying implement), and J-B Weld (another brand of very strong epoxy might work, but I can't confirm this). I also used 2 pair of pliers, a metal file, WD-40, a cup, paper towels, 2 paper plates, and a pair of scissors, but you may not need to. If there is anything inaccurate or otherwise should be address, please e-mail me at douglas.whitaker AT gmail DOT com.
| First, turn the laptop over and unscrew the two black screws shown in the picture. These hold the plastic piece which contains the power and volume buttons in place. |
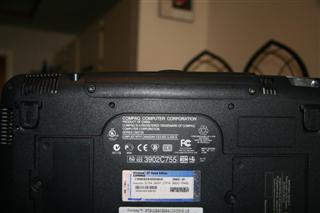 |
| Next, press the ESC and F1 keys to reveal a hidden slot. Insert the flathead screwdriver into this slot and pry the plastic piece up. |
 |
| Remove the two screws at the base of each of the hinges. You can flip the keyboard down, out of the way now, too. Open the laptop so the screen is perpendicular to the base. Now, press on the back of the plastic hinge covers. Don't force them, but it may take some work to get them out. Note that no removing of cables was necessary for this. |
|
| Now, on the display part of the laptop, there are two rubber screw covers. Remove these using a screwdriver or similar (they should come out easily). Remove the revealed screws. The plastic screen bezel should be loose now, so go ahead and lift it up (you don't need to take it all the way off). The hinges should now be totally revealed. Remove the last screw holding each to the laptop. The laptop should now look like the picture. |
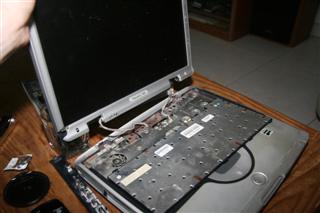 |
| Now, the hinges should be out of the laptop. They are comprised of two pieces: a flat mount and a friction generating unit. Separate the pieces. On my laptop, one of the hinges separated easily and one didn't - I used the pliers to separate them. Make sure that the friction generating units actually spin. I used pliers to test this on mine, and they were locked up. I soaked them in WD-40 for a few hours which allowed them to function. Make sure the hinges are dry before moving on. |
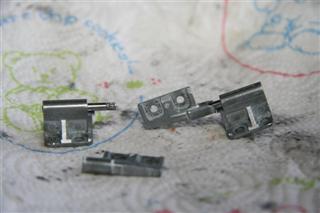 |
| Mix the J-B Weld tubes, and have something handy you can use to apply it with. I used a cut up paper plate to apply the J-B Weld to the hinge. Fill opening on the flat mount part with J-B Weld. The image should explain this, but make sure there is a good amount in there. Do this for both hinges. |
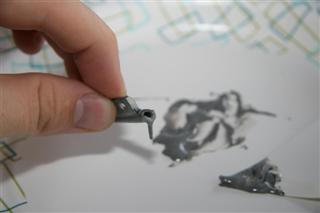 |
| Now slide the arm of the friction generating unit into the complimentary flat mount part. Make sure to not confuse which is paired with which. Also, excess J-B Weld will be displaced - if any gets on the friction generating unit, particularly where the arm enters the main piece, wipe it off with paper towels. You want the flat mount to be fused to the arm but to still allow the arm to spin with tension. Leave the hinges alone for 24 hours (really) to allow them to cure. |
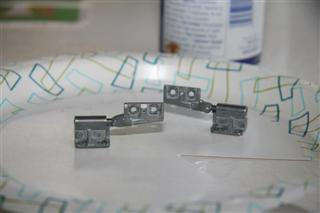 |
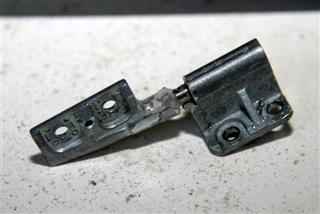
| The J-B Weld should have cured now and the hinges should be functional (I tested this with the pliers). If there are excess globs of hardened J-B Weld on the outside of the hinges, use a file to remove them. The area the hinges go on the laptop are a snug fit. |
 |
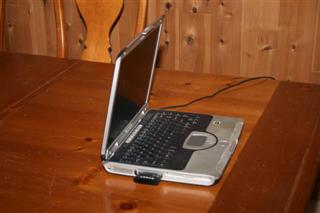
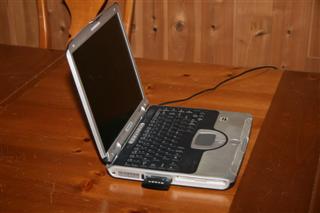
| Reverse the above steps to put the laptop back together. Make sure to put a screw through the screen bezel into the hinge (if not, just take it out when you realize the bezel doesn't fit right and there are empty screw holes). Your laptop should now be functional again. It isn't as good as a new set of hinges, but it is adequate. The pictures to the right show the minimum and maximum angle of opening that the laptop can support now. I don't know how long the repair will last, but it is simple, cheap solution that can be repeated if necessary. |
 |