Editing

Follow Recording Audio for the Web on Twitter Subscribe to Recording Audio for the Web's RSS feed

You've done all your preparation, gone out into the world and recorded your audio. Now what? The next step in the creation process is editing your recordings into one piece of audio - the elusive podcast. Here you will find out how to do some basic editing that will transform your audio from a group of audio tracks into one cohesive piece.

Audacity logo

I'm using a free software program called Audacity for this editing tutorial. You may also need to download a plugin or two to use certain functions (this is discussed later). You can click on each step below individually, or, if you know some basics already, jump ahead to the steps you need help with. If you have a specific question you can check out Audacity's online help manual. Audacity is a really great resource for basic editing. You can also record into the program directly from your computer.

Garage Band logo

Mac users can also use Garage Band to create and edit an audio (or video) podcast. Check out Apple's tutorial on using Garage Band. The audio library, jingles etc in Garage Band are an added bonus which can be useful to add depth or layers to your podcast.

So let's get started.

Step 1: Create a new file

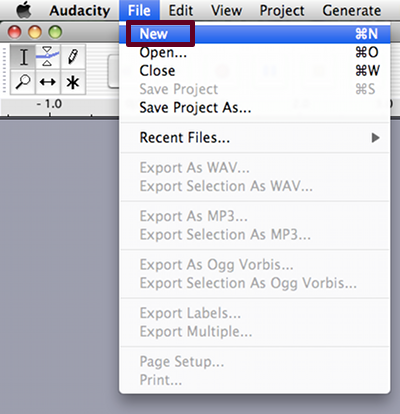
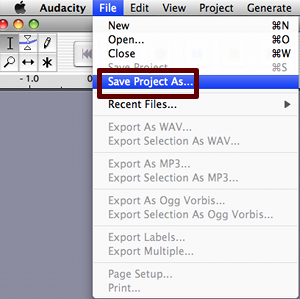
Once you've downloaded Audacity it may appear as an icon on your desktop. Double click to open it. If you don't see the shortcut you can find Audacity in your Applications folder (for Mac users) or in Programs for PC users. So, first things first. Open Audacity and create a new file. Be sure to save your work often. From time to time Audacity will encounter a problem and close (it's an open source program after all!)

Here's how to create a new file.

Create a new project Save your new project

Step 2: Import audio

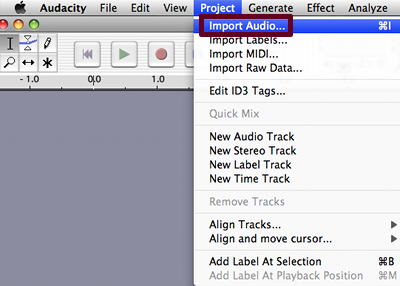
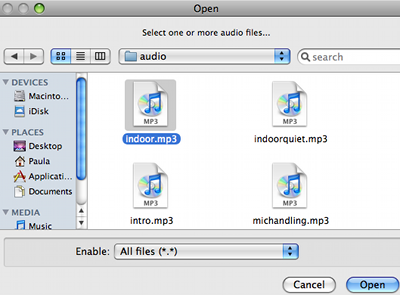
Now you import the tracks you've recorded. Follow the steps below.

Import window Pick your audio file

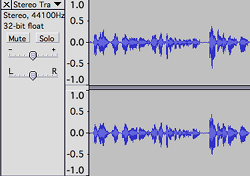
Once you choose the audio you want to import it will load onto a track in Audacity. Mono tracks are generally used for audio (speech) while stereo tracks are used for music and special effects (sfx). If your audio imports onto a stereo track but you want a mono track go to Project and click New Audio Track. Copy and paste your audio onto the mono track. Voila! This doesn't work if you want to transfer a mono to a stereo track though! Finally, check that the project rate is set at 441000 hz. If not, go to the Preferences menu and change it.

Take a look at the pictures below. The first is an audio track; the second is a stereo track.

Mono track Mono track

Step 3: Edit audio

This is the editing toolbar in Audacity. Most of the tools are pretty self explanatory but let's go through each one briefly.

Icons toolbar

The main tools for editing audio are below.The pictures on the right hand side of the page are taken from Audacity. They will help you visalize how your tracks will look when you use the different tools.

Selection tool The selection tool is used to select, highlight or deselect elements, like part of your track. Playback will begin from the cursor position.
Envelope toolExample of  waveforms altered with envelope tool The envelope tool allows you to adjust the levels of the audio. You can reduce and increase the size of the actual waveform to change the audio level.
Pencil toolThe draw tool allows you to pinpoint an exact part of your audio Example of waveform using draw tooland raise or lower the levels. Use this tool to edit problems with specific parts of your audio, such as pops or mic noise. You have to zoom right in on the waveform before you use the draw tool.
Zoom toolThe zoom tool allows you to zoom in on your audio. To zoom into a specific part of the audio click and drag your mouse over the area you want to zoom in on (make sure you've clicked on the zoom tool first!).
Time shift tool Example of aligned waveforms The time shift tool allows you to move the positioning of tracks. Use this tool to align multiple tracks.
The multi-tool activates all the previous tools so you can align, zoom and select without changing tools. The tool changes as you hover over the waveform.

Audacity toolbar

The next set of buttons allow you to change your position on the track - just like a CD player you can play, stop, pause, and move to the beginning or end of the track.

The next section of the toolbar shows your audio levels. If the levels reach the far right side of the box it means your audio is overmodulated (too loud). Audacity toolbar Take a look at the Recording page for tips on avoiding this problem. If you record directly into Audacity your microphone levels will be displayed in the box on the right hand side (see the little microphone?).

Audacity toolbarAs with most programs, the arrows allow you to undo and redo your actions and the magnifying glass zooms in and out on the track. This is useful if you can hear slight problems with the audio but cannot see them unless you zoom right in. The last two zoom buttons allow you view the whole track in one window.

Step 4: Effects

There are lots and lots of effects you can apply to your audio tracks. Feel free to play around with them and see what they can do. I am going to stick to fades and changing the levels of the audio on this page.

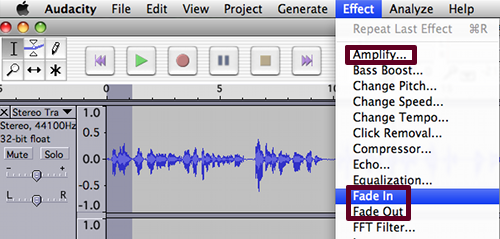
Effects window

Changing the levels: The amplify effect allows you to increase or decrease the volume of your tracks. If your interview is too quiet, or too loud for that matter, use the amplify tool to change the levels. You can play around with the amount of amplification you can apply to your track. There is no hard and fast rule as each audio recording could be a different level. However, if you see that your waveforms are overmodulated (clipping either side of the track) then you need to reduce your amplification.

TIP: Be aware that changing the levels will not only make the dialogue louder but it will also make the background noise louder. Don't use the amplify tool to correct bad audio recordings.

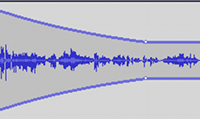
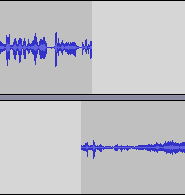
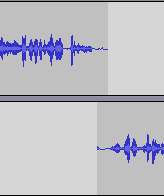
Example of fade out and fade in Fades: This is a really useful tool. You can use it to fade in at the beginning, or fade out at the end of your podcast. Select the section of your track you would like to fade in/out and choose the appropriate effect from the effects menu.
The picture on the right shows how fade in and fade out look on Audacity.

TIP: Use the fade in/out tools to transition from one sound to another, for example, to change ambient sound or music. The picture above shows how you can do that.

Step 5: Exporting file

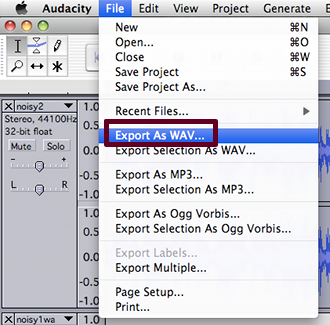
Now your audio is ready to be exported. You should export the audio as an MP3 file. WAV files are bigger, uncompressed files and are not suitable for uploading online. Here's the tricky part. You need to download a plugin to export files as MP3 on Audacity. That's not a big deal. But, if you don't want to download and install the plugin you could also use iTunes to convert the track to an MP3 file. I find this way a little easier because Audacity makes you search for the plugin each time you try to export as WAV. So, for this example I'm going to export the file as a WAV.

Export window

You'll see the second picture above shows the alert that pops up if you try to export your file as an MP3. Click on the link above to download the plugin or export as a WAV file.

Save the file on your desktop so it is easy to locate.

Here is how to convert your file from WAV to MP3 in iTunes.

Convert WAV to MP3 in iTunes
  1. Open iTunes
  2. Drag and drop your WAV file into iTunes
  3. Highlight the file you want to convert
  4. Go to the Advanced menu and click Create MP3 version. It will create an identical file underneath the WAV file in MP3 format.