
Insert window

Before starting to develop your web site using Dreamweaver, make sure to sketch out a draft of what you want your site to look like. Although there are many things go consider, start with sketching out details about three items - page layout, menu structure, and information layout (i.e. what sections your site will have). The web site design process can be very involved and some companies have entire teams of developers spending a year or more designing, testing, and implementing a web site.
Let’s start by building a simply web site. Here’s basic information regarding the three categories mentioned above:
Information layout: Determine the kind of web site you are creating, for what purpose, who the audience is, and what information you have to deliver. For demonstration purposes, we’ll build a student electronic portfolio and give it seven sections (Biography, Vitae, Goals, Philosophy, Program, Projects, and Readings).
Page layout: We are going to use a simple 3 cell design consisting of a header, menu, and content area. Here’s a sample of what this would look like:
| Header | |
| Menu |
Content Area
|
Menu structure: Based on the location of the menu in our page
design, we will use a vertical menu layout. Another thing to consider in menu
structure is
how do you display the menu structure two or three levels deep in the site.
Now it’s time to start building our web site Dreamweaver has several windows you can have open while designing your site. Two useful ones are the Properties and Insert windows. You can open these windows from the Window menu in Dreamweaver.
Properties window
Insert window
1. First start by creating a new HTML page. If Dreamweaver is not running, start the program. Go to the File menu and select New. A New Document window will open, make sure the General tab is selected, then click on Basic Page in the Category section, then HTML in the Basic Page section, the click on the Create button. This will open a blank HTML document.
2. At this point you can just start adding content to your page by typing,
adding images, etc. However, adding content in this manner does not provide
a structure to format how this content is displayed on the screen. There are
many ways for controlling content layout on a web page, two popular methods
are tables and layers. For this tutorial, we'll discuss tables. Let's create
a main table to house the content for our page. You can insert a new table
by going to the Insert menu
and selecting table, or you can click on the Insert
Table icon ![]() in
the Insert window. Almost every menu selection has a corresponding
icon in a window you select. We'll mostly use the icons in this tutorial.
in
the Insert window. Almost every menu selection has a corresponding
icon in a window you select. We'll mostly use the icons in this tutorial.
3.
The Insert Table window will open. Since the table illustrated
in our Page Layout sample above has two rows, we can indicate
that in this window. Let's design our page to be viewable in a monitor having
a resolution of 800x600. We'll set the table width to be 750 pixels to
account for browser scroll bars. Border, Cell Padding, and Cell Spacing are
all set to zero. Let's save what we've done so far. Go to
the File menu and select Save As. When the Save As window
comes up, enter the name index.html in the Save As field,
then navigate your way to the Tutorial folder on the Desktop and save the file
there.
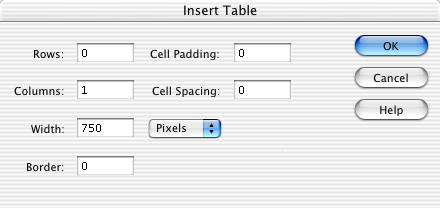
Most items in the Insert Table may be intuitive, but the
Cell Padding and Cell Spacing items can be confusing. Cell Padding sets the
amount of space
between the content of a layout cell and the cell boundary, and
Cell Spacing sets the amount of space between adjacent layout cells.
![]()
You should now have a table on your page that looks like this:
![]()
The top row will be the header section, the bottom row will be for the menu and
content
area sections. We need to divide the bottom row into two columns for the menu
and content area. Before we do this, let's set an alignment property for the
cell. Click your cursor in the bottom cell of the table and select Left from
the Horz drop down menu and Top from the Vert menu
in the Properties window. In Dreamweaver, cell properties are
inherited from existing cells when you create a new cell. Now we'll create a
new cell by splitting the bottom row (cell). To
do
this,
click
your
cursor
anywhere
in
the
bottom
row,
then
click split cell rows icon ![]() .
The Split Cell window will open, select to split the cell into
2 columns. If you click your cursor in each cell, you'll notice both cell's alignment
properties are the same. That's because the new cell inherited the properties
from the existing cell when we split it. Now
put
your
cursor
in
the
bottom
left
cell
and
set
its width to 150 pixels. This is accomplished by entering the value 150 into
the
width
field
in
the Properties window. Now put your cursor in the bottom right
cell and set its width to 600 pixels.
.
The Split Cell window will open, select to split the cell into
2 columns. If you click your cursor in each cell, you'll notice both cell's alignment
properties are the same. That's because the new cell inherited the properties
from the existing cell when we split it. Now
put
your
cursor
in
the
bottom
left
cell
and
set
its width to 150 pixels. This is accomplished by entering the value 150 into
the
width
field
in
the Properties window. Now put your cursor in the bottom right
cell and set its width to 600 pixels.

4. Let's add some color to our table. This can be done by changing the background
color of the table cell or adding an image inside the cell ... or both! Let's
add an image. Click your cursor in the
top cell of the table and click the Image icon ![]() in
the Insert window and select the file named header.gif found
in the images folder
inside the tutorial folder on the desktop. Once you've selected
that file, click the Choose button.
in
the Insert window and select the file named header.gif found
in the images folder
inside the tutorial folder on the desktop. Once you've selected
that file, click the Choose button.
5. If you wanted your menu area to be the same color as the image you just
inserted, click your cursor in the bottom left cell of the table. To enter
a background color, you can either manually insert the color for the cell,
or you could click the square icon ![]() next
to the letters Bg in the Properties Windows and select a color
from a pallette. Let's manually enter the the color #CCCC99 in the field to
the right of the
next
to the letters Bg in the Properties Windows and select a color
from a pallette. Let's manually enter the the color #CCCC99 in the field to
the right of the ![]() icon.
On a web page, HTML colors are defined using a hexadecimal
notation for the combination of Red, Green, and Blue color values (RGB). The
lowest value that can be given to one of the light sources is 0 (hex #00).
The highest value is 255 (hex #FF).
icon.
On a web page, HTML colors are defined using a hexadecimal
notation for the combination of Red, Green, and Blue color values (RGB). The
lowest value that can be given to one of the light sources is 0 (hex #00).
The highest value is 255 (hex #FF).

This is what our web page looks like so far

6. Let's populate our menu area with links to our site. Because we'll use
this page as a template to create other pages, we'll want to have a link to
each section of our site, including the home page. So, let's make the first
link a link back to the home page. We'll then want to populate the rest of
the menu with the
items Biography, Vitae, Goals, Philosophy, Program, Projects, and Readings.
We could
simply
type these
into the lower left cell of the table, but we may want more control over how
they
appear, so let's put them in a table. Click your cursor in the lower left cell
of the table and click on the Insert Table icon ![]() in
the Insert window. Set the properties for this new table to
have 9 rows, 1 column, width of 100%, border of 0, cell padding of
3, and cell spacing of 0, click the OK button. Now we can
click our cursor inside each cell and type the text for each menu item.
in
the Insert window. Set the properties for this new table to
have 9 rows, 1 column, width of 100%, border of 0, cell padding of
3, and cell spacing of 0, click the OK button. Now we can
click our cursor inside each cell and type the text for each menu item.
7. We'll
have two extra rows at the bottom of our new table, so we can use one to insert
an email link so someone can contact you. Click your cursor
in the
row second from the bottom and click on the Email Link icon
![]() in
the Insert window.
Insert the words Email Me in the Text field
and your email
address
in the E-Mail field. Save the file.
in
the Insert window.
Insert the words Email Me in the Text field
and your email
address
in the E-Mail field. Save the file.
8. If you decide you want more rows in your menu table to insert more menu items, you can always add more. Simply click your cursor in the cell where you want to start adding row(s) (or columns), then click on the Modify menu, then Table, then Insert Rows or Columns.
9. Let's insert a table inside the Content area of our table
to help control how content is displayed. Click your cursor in the bottom
right cell of the main table and click on the Insert
Table icon ![]() in
the Insert window. Set the properties for this new table to
have 1 row, 1 column, width of 100%, border of 0, cell padding of
5, and cell spacing of 0, click the OK button. Click your
cursor in this table and set the horizontal alignment to left and
the vertical alignment to top. This table will primarily help
use with the margin between the content area and
the menu.
in
the Insert window. Set the properties for this new table to
have 1 row, 1 column, width of 100%, border of 0, cell padding of
5, and cell spacing of 0, click the OK button. Click your
cursor in this table and set the horizontal alignment to left and
the vertical alignment to top. This table will primarily help
use with the margin between the content area and
the menu.
10. The main page of this site is coming together, so let's use it as a template to create one of the other pages in our site. We are not using this file in the true sense of a Dreamweaver template. Consult the Dreamweaver documentation to learn more about how templates can assist in developing and maintain your web site. Go to the File menu and select Save As and enter the name projects.html. Now the page you are working on is no longer the index.html page, but is now the projects.html page. Click your cursor in the bottom right cell (to the right of the menu) and type the word Projects. You can format the text if you wish by selecting the text and choosing any formatting option from the Properties window or by clicking on the Text menu and selecting an option from there.
11. Let's insert some media elements on your Projects page. We've already
learned how to insert an image in step 4 above, so let's insert a video element.
Depending on how you want it displayed, there are several ways
you can insert media elements into your web page. If you want an external player
on the user's computer to open the file, you can simply type some text and
create a link to your video or audio file. When a user clicks the link, the
appropriate program on their computer will open and play the file. Let's create
one of these links.
Click
your cursor on the Projects page where you would like this link to appear.
Type the words Gatorade Video,
then select that text with your cursor. You can either manually type the
location of the video file in the field next to the word Link in
the Properties window, or you can click on the folder icon
and navigate your way to the GatoradeCommercial.mov file,
which is located in the videos folder inside the tutorial folder on the desktop.
It's usually a better idea to create the link using the folder icon to navigate
to the file.
The same process applies to creating a link to an audio file or even a Word
file. If you created a link to a Word file, Microsoft Word would open up the
file when a user clicked the link.

While we are creating internal links to files in our web site, let's take this time to make a link back to the home page. Select the text Home Page in the menu area and click on the folder icon next to the Link field in the Properties window. Navigate your way to the tutorial folder on the desktop and select the index.html file. Now when a user clicks on the text Home Page, their browser displays the home page.
12. If your media element requires specific software to view, it's always
a good idea to create a link to the web site where a user can download the
software. To do this, create the link similar to what you did when you created
a internal link to the video file. This time, instead of creating a link
to a video file, you will create a link to an external web site. Type the words
Download Quicktime on your page, select that text with your
cursor and enter the text http://www.apple.com/quicktime/ in
the Link field in the Properties window.
Now click on the arrows ![]() next
to the word Target and select _blank. Web
page links have a property called Target.
The Target property indicates how the link is opened and it has four possible
options (_blank, _parent, _self, and _top). All but the _blank option are for
links
used within a web page that uses frames. I don't recommend using frames. The
_blank value indicates that the link will open in a new browser window. If
you didn't select anything for the Target value, the link would open in the
same
browser window as the page in which it was clicked. Basically, it would replace
your web page with the web page indicated by the link. Target's value can be
set to other values, but those four are the basics.
next
to the word Target and select _blank. Web
page links have a property called Target.
The Target property indicates how the link is opened and it has four possible
options (_blank, _parent, _self, and _top). All but the _blank option are for
links
used within a web page that uses frames. I don't recommend using frames. The
_blank value indicates that the link will open in a new browser window. If
you didn't select anything for the Target value, the link would open in the
same
browser window as the page in which it was clicked. Basically, it would replace
your web page with the web page indicated by the link. Target's value can be
set to other values, but those four are the basics.
13. In addition to making links to internal and external HTML
and media files, you can create links
to specific places within an HTML page. This is useful if you want the user to
click a link and open a file (or the same file) to a specific place in that
file. This is a two step process, first create the anchor, then create the
link to the anchor. Let's create an anchor in our Projects page. Click your
cursor below the last text entry in the content area of the projects.html page.
Press the
return key many times so that you are far down the page. Now
type the words
Embedded video. Click your cursor in front of the E in
the words Embedded video and click the Named Anchor icon ![]() in
the Insert window, type the word embed in
the field provided. You now have an anchor located at the words Embedded
video.
in
the Insert window, type the word embed in
the field provided. You now have an anchor located at the words Embedded
video.
14. The next step is to create a link to this anchor.
Scroll
back to the top of the page and type the words Embedded video again
and select that text with your cursor. Type the word #embed in
the Link field
in the Properties window. Save this file.

15. A more advanced way to include video and audio in your web page is by
embedding it within the page. Users that have the Quicktime plugin
installed can view the video on the web page without an external player opening
up. To insert an embedded media file you can either use Dreamweaver's menu
option or insert the code directly into the page. Because there are many attributes
in the code, I find it easier to insert the code directly into the HTML by
copying and pasting it from an existing document. If you wanted to insert it
using the menu option, you would click on the Insert menu,
then click on Media, then ActiveX. Let's
just copy the code into your document. On your Projects page, type the word
insert video here wherever you want to insert the embedded
video,
then select the text below with your cursor and press the Apple key and the
C key
(copy
it
to the
clipboard). Now
go back to your projects.html page in Dreamweaver. Using your cursor, select
the insert video here text, then click on the Edit menu
and select Paste
HTML.
You should now see an ax icon on your page. If you don't have
the HTML version of this file available, you'll have to type
the
code
in the
code
view
of the
page.
To view
the page
in code
view, click on the Show Code View icon ![]() in
the far upper left corner of the projects.html window. Here's is the code you
need to paste into the document:
in
the far upper left corner of the projects.html window. Here's is the code you
need to paste into the document:
<OBJECT CLASSID="clsid:02BF25D5-8C17-4B23-BC80-D3488ABDDC6B" WIDTH="228" HEIGHT="186" CODEBASE="http://www.apple.com/qtactivex/qtplugin.cab">
<PARAM name="SRC" VALUE="videos/GatoradeCommercial.mov">
<PARAM name="AUTOPLAY" VALUE="false">
<PARAM name="CONTROLLER" VALUE="true">
<EMBED SRC="videos/GatoradeCommercial.mov" WIDTH="228" HEIGHT="186" AUTOPLAY="false" CONTROLLER="true" PLUGINSPAGE="http://www.apple.com/quicktime/download/">
</EMBED>
</OBJECT>
You may be tempted to use Dreamweaver's Properties window
to format the text on your page, and for some formatting, that is the correct
approach. However, there is a more efficient and powerful way to format text
and that is through the use of cascading style sheets. I have included a sample
CSS file for use in this tutorial. To have the projects.html page use the CSS
file for page formatting, click on the Window menu and select CSS
Styles. The CSS Styles window will open, click on the Attache
Style Sheet icon ![]() at
the bottom of the CSS Styles window. Now click the Browse button
and select the tutorial.css file in the tutorial folder on
the desktop and click the OK button. Save the projects.html
file. You will notice the text formatting changed. To view what the CSS contains,
open the tutorial.css file by click on the File menu and selecting the tutorial.css
file.
at
the bottom of the CSS Styles window. Now click the Browse button
and select the tutorial.css file in the tutorial folder on
the desktop and click the OK button. Save the projects.html
file. You will notice the text formatting changed. To view what the CSS contains,
open the tutorial.css file by click on the File menu and selecting the tutorial.css
file.
This is an example of what the projects.html page should look like:
 |
||||||||||||
|
|
|||||||||||
http://www.macromedia.com/devnet/mx/dreamweaver/
http://www.apple.com/quicktime/authoring/poster_movies.html
http://www.apple.com/quicktime/authoring/embed.html
http://developer.apple.com/quicktime/compatibility.html
http://www.audiovideoweb.com/embed_quicktime_html.htm